In many web applications, we have to work with remote databases. It is very hard to manage those databases by accessing the remote server on which our database runs. Therefore, if we have a way to manage those databases locally using a UI, our life is getting easier.
Now I will show you how to manage those databases using phpMyAdmin locally. For that, we have to do some configurations.
The file config.inc.php contains the configuration settings for your phpMyAdmin installation. It uses an array to store sets of config options for every server it can connect to and by default, there is only one, your own machine, or localhost. In order to connect to another server, you would have to add another set of config options to the config array.
First open config.inc.php file held in phpMyAdmin folder. In wamp server, you can find it in wamp\apps\phpmyadmin folder. Then add following part to that file.
$i++;
$cfg['Servers'][$i]['host']          = 'hostname/Ip Adress';
$cfg['Servers'][$i]['port']          = '';
$cfg['Servers'][$i]['socket']        = '';
$cfg['Servers'][$i]['connect_type']  = 'tcp';
$cfg['Servers'][$i]['extension']     = 'mysql';
$cfg['Servers'][$i]['compress']      = FALSE;
$cfg['Servers'][$i]['auth_type']     = 'config';
$cfg['Servers'][$i]['username']      = 'username';
$cfg['Servers'][$i]['password']      = 'password';
Pay attention that the config array is called cfg and it’s a multidimensional array and that all servers, have to be part of the $cfg["Servers"] inner array. The way this works is by using an incrementing variable $i that sets a different inner array for each server inside the$cfg["Servers"] array. For this to work you need to make sure each new set of config options starts with an incremented $i by using $i++.
Let’s see what is the meaning of these variables.
- $i++ :- Incrementing variable for each server
- $cfg[‘Servers’][$i][‘host’] :- Server host name or IP adress
- $cfg[‘Servers’][$i][‘port’] :- MySQL port (Leave a blank for default port. Default MySQL port is 3306)
- $cfg[‘Servers’][$i][‘socket’] :- Path to the socket (Leave a blank for default socket)
- $cfg[‘Servers’][$i][‘connect_type’] :- How to connect to MySQL server (‘tcp’ or ‘socket’)
- $cfg[‘Servers’][$i][‘extension’] :- php MySQL extension to use (‘mysql’ or ‘msqli’)
- $cfg[‘Servers’][$i][‘compress’] :- Use compressed protocol for the MySQL connection (requires PHP >= 4.3.0)
- $cfg[‘Servers’][$i][‘auth_type’] :- Method of Authentication
- $cfg[‘Servers’][$i][‘username’] :- Username to the MySQL database in remote server
- $cfg[‘Servers’][$i][‘password’] :- Password to the MySQL database int he remote server
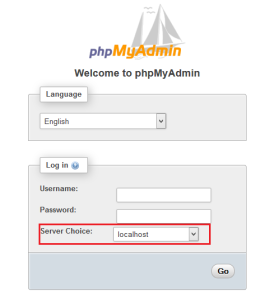
After adding this part to the config.inc.php file, restart your local server. Now your phpMyAdmin home page will display like follow.
Now in the server choice field, there will be a localhost and a new server that you configured. Choose that remote server and enter the username and password of that remote database. Then click ‘Go’ button and it will connect to your remote database and now you can manage it locally.


can I make both of my database ( on server and local ) updated each other by this way ?
thanks
LikeLike
PHPmyAdmin still not able to connect. Giving error
#1045 – Access denied for user ‘myusername’@’localhost’ (using password: YES)
LikeLike